When installing git on Windows, we need to do some steps for installation and setup before working with it so I will keep track them below as well as the reason why I do that. If you have any suggestion to improve it, I’m very appreciated to know and learn to make it better.
Since I will clone git using SSH as the article How to use git with SSH key so my setup will make sure it works with SSH as well.
Download and install Git client
- Go to Git-scm and download the latest 64-bit version.
- Start the setup by double click the installer.
Click next on first screen and in the
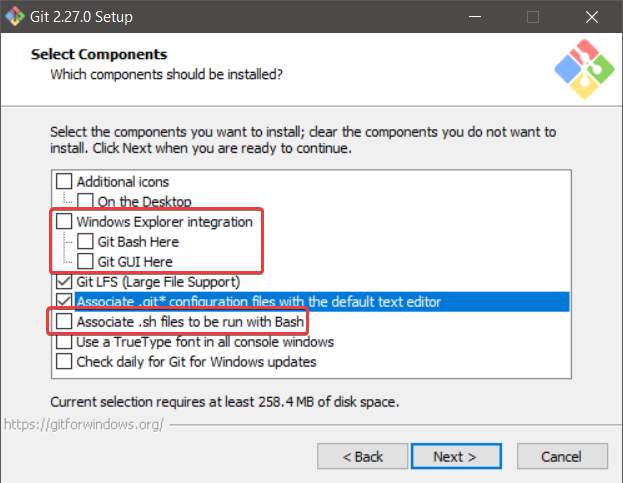
Select componentscreen. I uncheck toWindows Explorer integrationandAssociate .sh files...because I don’t use those features and put more things to my mouse-right-click menu.![]()
Click next until the
Choosing the default editor used by Gitscreen. I change it toUse Notepad++ as Git's default editorinstead, since I would like to use Notepad++ because it’s light and fit to this job.![]()
Click next and go to
Adjust your PATH environmentscreen and keep the recommended option because as descibed, it makes Git works well with any tools.![]()
Click next and in the
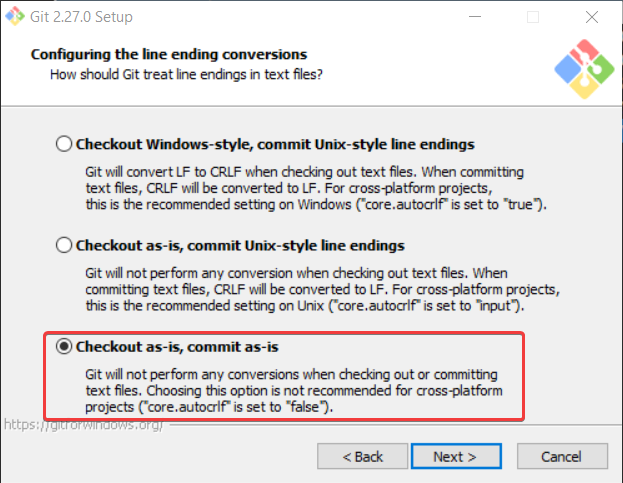
Configuring the line ending conversionsscreen, I choose theCheckout as-is, commit as-issince I don’t want Git to do any conversion when doing checkout/commit.![]()
This option could be overrided later with git command
$ git config --global core.autocrlf falseClick next and in the
Configuring the terminal emulator to use with Git Bash, I choose toUse Windows' default console windowbecause as I said before, I don’t want to install any other terminal. Actually, I use other tools (PHPStorm and Windows Terminal) for this job so just keep thing light 😉![]()
- Click next and in the
Choose the default behavior of git pull, I leave it as default (fast-forward or merge) Click next and in the
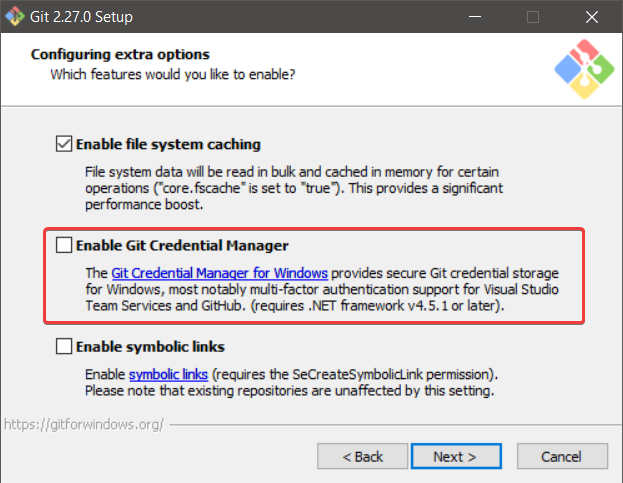
Configuring extra options, I uncheck theEnable Git Credential Managerbecause I use SSH so no need to use this. But we should keep it if want to HTTPS and enable multi-factor authentication.![]()
- Click next and install button in the last screen. I don’t want to try any experience feature because it’s working environment and should be stable as much as possible.


Setup default email and user name
Before doing any git commit, we need to setup git username and email with the commands below
1
2
$ git config --global user.name "Vu Nguyen"
$ git config --global user.email [email protected]
It’s possible to config the specific email in a single repository. In the repository folder, run the following git config command
1
$ git config user.email [email protected]
Setup SSH key
This step could be simple or complicated due to what we need, such as my requirement is
Use only one SSH key for all machines.
So I don’t have to manage the SSH key by creating a new one for every machine, and remember to remove it when not used anymore.
Prepare SSH key
- Create an SSH key following this guide from github.
- Upload SSH key to git repositories following my guide.
Configure SSH key
Create a
configfile inside~/.ssh/folder. The folder isC:\Users\nhvu\.ssh\on my machine but different username on yours.The file has no extension, remember removing
.txtor anything else if creating using Windows Explorer.Add the content below and update
~/.ssh/id_rsato your SSH key file path or keep it if you just create a new one.1 2
host * IdentityFile ~/.ssh/id_rsa(Optional) This step is not for me but for someone want to have specific SSH key for each host, you can add more record to the
configfile.1 2 3 4 5
host github.com IdentityFile ~/.ssh/id_rsa.github host gitlab.com IdentityFile ~/.ssh/id_rsa.gitlab