Azure provides many tools and services that fully and completely convenience for the software development, from code repository (source control), build, release and hosting application… So in this post, I will introduce some concepts and fundamentals in my development process to work on Azure environment.
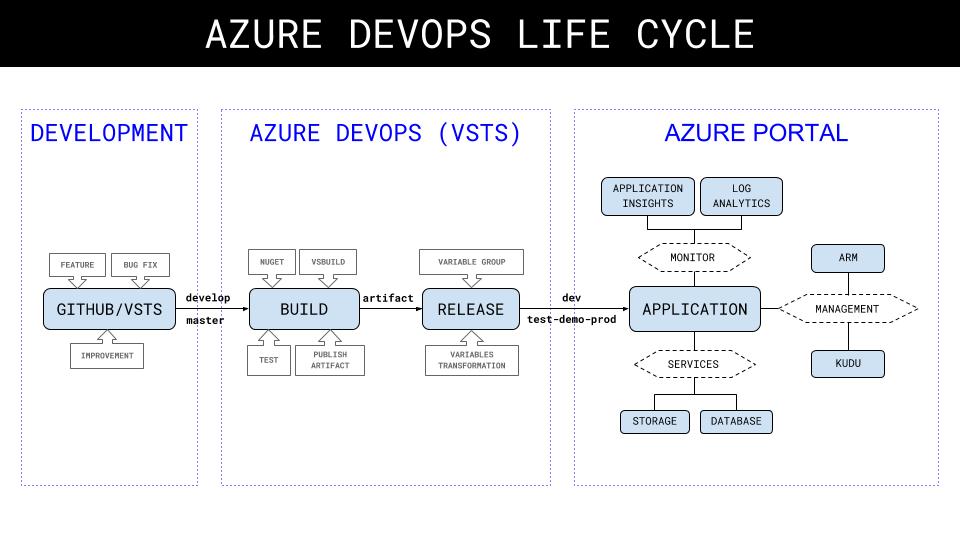
Azure has two main places that we work on. The first one is Visual Studio Team Services (VSTS) - now called Azure DevOps Services - which mostly used by developers and operations teams to develop and deploy the application. The second is Azure Portal where we use to view and manage the application resources such as web app, database, virtual machine… and it also provides strong monitor tools to trace down issues and maintenance of the application.
In my sample website application, we have 3 projects, one is ASP.NET Web application, the second is NUnit Test project and the last is Azure Functions, all of them are created by Visual Studio in a single solution. As I would like to deploy them to two applications, one is an app service and another is Azure Functions in Azure environment.

Develop
We can use Git or TFS in VSTS to manage our codes and easily cooperate with any other Azure services, I won’t talk much this since Microsoft just bought Github so we can use Github as well. Since we use git-flow when developing so we always have 2 main branches, develop using for development only and master using for testing and deploying to production.

Build Pipeline
The main purpose of build tasks is compiling and verifying the source code, includes testing by performing unittest or integration test in a middle step as well. In the final step, it ends up with an artifact published that is ready to use in the release pipeline.
An artifact is the outputs of build tasks, it mays contains the package of files that we want to produce or anything else we want to deploy to our application. In .NET project, it often contains a bin folder with some draft *.config files such as ApplicationInsights.config, web.config or app.config…
A build pipeline could be used to build for a single project and publish one artifact or to build the whole solution with multiple projects that come with many artifacts in the final result. But I recommend that we should devide the solution to many single artifacts that will be run in many separated pipelines.
Since in my example, I just want to deploy 2 applications so I will create 2 build pipelines for them. The first build is for compiling Web application, doing unit-tests in Test project and publish a website package artifact. The second one is for compiling and publishing Azure Functions artifact only. Totally, we have 4 build pipelines like this

Agent pool
When creating a new build pipeline, we need to select an agent pool to run the build tasks. The build agent mays depend on which’s kind of your project and the VS2017 should work at all excepting your project need to be built in macOS, please change to Host macOS instead.

In my example, we will select Hosted VS2017 to run, it’s just a hosted machine having built-in VS2017 including all necessary components for the development.
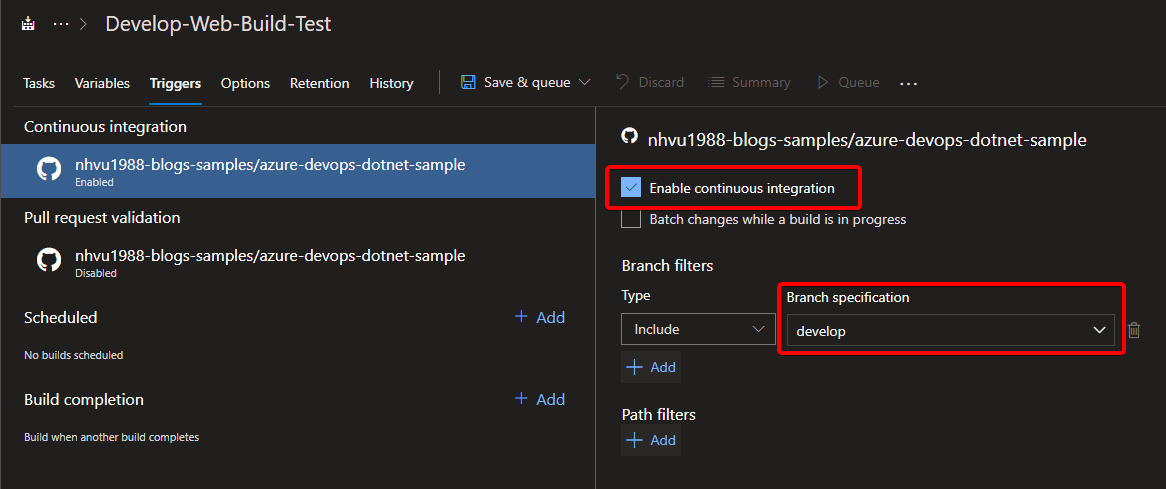
Branch trigger
Whenever code is pushed to main branches, we will trigger a build pipeline automatically. Firstly, we need to setup for the trigger when code is published to the main branch.
In the Trigger tab of build pipeline, check to Enable continuous integration and select a main branch in Branch filters list.
Build Tasks
A .NET build pipeline often contains 4 basic tasks.

They should be automatically generated when we select a build template, or we can start with an empty task and add them manually later.

Nuget Restore
The first step is nuget restore, it needs to restore Nuget libraries before making build .NET application. If we want to build whole solution, add path to .sln file to restore, otherwise select packages.config in a project to build for a single project.
Visual Studio Build
The VSBuild task is very simple, just select the .sln to build whole solution or .csproj to build a single project. Other configurations could be keeped as default.
The important config in this step is MSBuild Arguments where we can put some build arguments but we will discuss it in another post since every argument fits a specific build scenario.

Visual Studio Test
We can use the default settings of the Visual Studio Test task and it will automatically detect and run test for all dlls having tests keyword, or we can have a simple modification in Test Assembly setting for compatible with our test project name. This task will run as the same with Test runner on Visual Studio same version.

Publish Build Artifacts
We just leave this task as default since it will copy all ouputs from artifact staging directory to a publish location in TFS server.

Release Pipeline
After an artifact is ready, we will create new release from a release definition and start deploying to Azure resource. Each release could contains one environment (formally Stage in VSTS) like Dev or multiple environments such as Test, Demo, Prod in my example.

Variables Transform
Before deploying to Azure, we will do an important step that is transform all draft variables to correct variables matching to every specific environment. For example, we have a variable Environment that our application will read and know which’s environment it’s running on. That variable stays in Web.config, its value is Local as I’m running locally but I would like to transform it to Dev, Test, Demo, or Prod when existing on the Azure app service.

Pipeline Variables
We can set that variable in the Pipeline variables and it will be automatically transformed during deployment process, just simply enable XML variable substitution in Azure App Service Deploy task.

The pipeline variables will available to all tasks in the current release so it should contains all needed variables. It could be a appSettings in web.config or app.config file, the AppServiceName that we use in the deploy task, or anything else should be a dynamic variable.

Variable Groups
The variable groups are just the same and be used as the same with pipeline variables, excepts its values will available in cross releases. It means, all dynamic variables you want to use in multiple releases, just define and put them to a variable group in the Library section

So in my example, I will move the Environment variable to the variable group Dev since I would like that variable is available and can be read in Deploy AzureFunctions to Dev release as well. So I will link the variable group Dev to both Deploy Web to Dev and Deploy AzureFunctions to Dev.

Now, all tasks in both releases to Dev can read the Environment with the value is Dev as the same.
Continuous Deployment Trigger
We can enable the trigger on whenever an artifact is ready, a new release will be created and deploy application automatically.

And for auto deploying to specific environment. It’s recommended to enable this trigger for development only, and other environments should be deployed in person.

Azure Portal
Since Azure Devops is used for development and deployment process, the Azure portal is the place for resource management and application monitoring. We will work with the application resource and its third party services, all available Azure services could be managed and accessed from there.
Azure Portal provides a strong management and monitoring tool names Monitor combining from two services are Log Analytics and Application Insights. Both of them could be integrated and configurated easily in our application. They will automatically collect activity logs, diagnostic logs and telemetry from our applications and visualize it to portal, so we can check our application health, measure application performance…
ARM template
ARM stands for Azure Resource Manager, it’s a JSON file that contains all Azure resource’s information that we want to manage. So in my example, I will create a JSON that contains 2 resource items, the first one is an app service for the web application, the second is a Azure Functions for the functions app.
1
2
3
4
5
6
7
8
9
10
11
12
13
14
15
16
17
18
19
20
21
22
23
24
{
    "$schema": "https://schema.management.azure.com/schemas/2015-01-01/deploymentTemplate.json#",
    "contentVersion": "1.0.0.0",
    "parameters": {},
    "variables": {},
    "resources": [
        {
            "name": "Web Application Sample",
            "type": "Microsoft.Web/sites",
            "apiVersion": "2016-08-01",
            "location": "Southeast Asia",
            "properties": {}
        },
        {
            "name": "Functions Application Sample",
            "type": "Microsoft.Web/sites",
            "kind": "functionapp",
            "apiVersion": "2016-08-01",
            "location": "Southeast Asia",
            "properties": {}
        }
    ],
    "outputs": {}
}
In the ARM template, we can add many things, including every application property, configuration settings… so it’s recommended we should update the ARM in every changes in the Azure resource that need to be updated. Since it helps us to keep track what was the change and when the change was effected.
The ARM template could be managed in a VS project and automatically deployed in VSTS as well. So I have created one more project in my sample solution like this
